You know who you are. You are cleaning out the fridge and see a drawer full of veggies that you intended on cooking throughout last week. But, things got crazy and the kids had things. Before you throw them out, WAIT! Keep reading!
I was looking for a way to add a little zing to boring, old rice. The original recipe comes from Betty Crocker, my never ending cooking go-to guide. I found it in the poultry section as a stuffing, and thought it would be great as a chicken side. Well, it turned out better than just a side and became the main whoo-hoo of the dinner!
This one is dedicated to all of you out there who end up with a drawer full of veggies a week later after your grocery shopping. It's a great recipe on a Monday, or any day where you've cooked bacon the day before and have a couple of leftover pieces. HOLD UP....leftover bacon??? You can leave this part out, but as they say, bacon makes it better.
All veggies listed are optional and can be subbed for what you have.
___________________________________________________
Clean out the Veggie Drawer Rice
2 TBsp butter or margarine
stalk of celery
1/4 cup chopped onion (any color will work here)
1/2 tsp salt
Dash of pepper
2 cups of cooked rice (leftover rice also works well here!)
Handful of chopped walnuts (pecans or almonds can be subbed, but please leave them out if you don't like 'em or if they'll send you to the emergency room)
Handful of raisins (not gross, trust me!!)
1/4 tsp paprika
4 slices of cooked bacon, crumbled
My FAVORITE added veggies include: carrots, peppers, mushrooms or basically, any veggie that tastes good cooked. I think peas, eggplant or corn would be great as well. Throw in what you have!!
Melt the margarine in a large skillet over medium-high heat. Stir in onions, veggies, salt and pepper. Stir occasionally until veggies are tender. Remove from heat.
Stir in veggie mixture with the remainder of the ingredients. Serve warm or cold.
______________________________________
Easy. Rice will never be the same for you and your family after you try this.

Monday, December 21, 2009
Tuesday, December 15, 2009
Nana's Mini Mac n Cheese Bites

Have I told you about my friend Nana? Well, she loves anything that can be made into mini muffins. When she brought these Mac n Cheese Bites to a tea that we had, they were a major hit. She has since made them for other occasions and they always go fast. Many of us Lunching Ladies make things for various occasions, and usually on a weekly basis. Put this one in your queue, people. Trust me, everyone will be asking for the recipe.
As far as ingredients, the one thing that you may have trouble getting is the cheddar cheese. It was a glorious day last week when our commissary was stocked back up with it after being out for many, many months. Let's just say that as hard as the Land D'Or 'cheddar' from Carrefour tried, it just didn't cut the mustard.
The recipe is adapted from a recipe from Food and Wine Mag, November 2007.
_____________________
Mini Mac and Cheese Bites
Makes about 50
3TBsp butter
4 Tbsp flour
1.5 cups of milk
3 cups sharp shredded cheddar cheese (can substitute other meltable cheese, such as American or Colby)
1/2 cup Parmesan cheese, plus some for sprinklin'
2 large egg yolks
1/2 tsp salt
1/4 tsp nutmeg
1 lb elbow macaroni, cooked and drained
Preheat oven to 425 degrees. Spray mini muffin pans with non-stick spray.
In a large saucepan, melt butter over medium heat. Whisk in the flour and cook for about 1 minute. Whisk in the milk and bring to a boil. Cook, whisking occasionally, for about 2-3 minutes until thickened. Add cheddar and Parm cheeses and stir to melt. Remove from heat and stir in egg yolks, salt and nutmeg. Stir in macaroni.
Spoon slightly rounded tablespoons of macaroni and cheese into mini muffin pan. Each cup should be filled to the top. Pack each one down gently. Sprinkle with remaining Parm cheese.
Bake for 10 minutes until golden and sizzling. Take out and let cool for 5 minutes. Use a teaspoon and carefully loosen bites and transfer to platter.
To make ahead, bake and cool mac n cheese bites. Package and refrigerate. Place bites on baking sheet and heat at 400 degrees for 5 minutes. Serve warm.
_________________________________
These make an excellent appetizer for the holidays and will impress your guests. And you may fall in love with your mini muffin tins all over again!
Chicken in a whole new light
Here in Tunisia, chicken is king. I think I've eaten more chicken here to last a lifetime. Partly because it's inexpensive and easy. Also, the beef here just isn't what it's like back in the states. Coming up with a new way to fix chicken is almost as good as getting a package from the pouch or DPO. Sorry, bad mail joke.....
This is an easy recipe for a sauce/glaze and you should be able to get everything locally. One thing I'll mention is that you could use chicken breasts, strips or even wings and drummies. I made this with normal drumsticks and it turned out great.
Tangy Chicken Glaze
1 package of chicken drumsticks (or any other chicken parts)
Equal parts of honey and soy sauce (for 1 small package, 3 TBsp of each works well)
1 TBsp of chili sauce or marmalade (you could also use apricot preserves)
Pinch of ginger
1 minced clove or sprinklin' of garlic powder
Preheat oven to 375 degrees. Rinse and pat chicken dry. Sprinkle with salt and pepper.
Bake chicken in preheated oven for 30 minutes.
While baking, mix remaining ingredients.
Remove chicken and brush with glaze. Put back in oven and repeat glazing every 10 minutes until chicken is done.
- Drumsticks - 20-25 more minutes
The sauce will thicken upon baking. Use this to pour over the chicken when out of the oven.
__________________
For those looking for a great wing sauce, try this! You will need to make some modifications with baking times, but I think it would be fantastic.
I'd like to apologize to all of the LLOR readers as I've been slackin' recently. I guess that's what happens during the holidays! More recipes to come :)!!
Thursday, November 26, 2009
Pie Crust- Friend or Foe?

It's Thanksgiving morning and I'm waiting for my turkey to thaw completely before it goes into the oven. Despite how many days before it goes from freezer to fridge, I inevitably participate in this Turkey Day AM ritual pretty much every year.
A few years ago I attempted making pie crust from scratch for an apple pie that could rival Gabrielle's, my mother-in-law's. I awed at her ability to make such a flaky crust that I thought, wow, I will NEVER be able to do that. In addition, I was always amazed at how many apples she put into the pie. Anyways, my first apple pie was a flop...crust soggy underneath, the top and edge crust so tough that it was better to soak it in whipped cream before eating it due to a chance that you might just break a tooth. What had I done to deserve such horrible luck?
After finally getting over the pie-which-shall-not-be-mentioned, I got my nerve up to try it again. Martha had said it was easy. Online bakers said it was easy. Everyone was saying it was easy....
One of the best recipe books I have discovered over 10 years of marriage is the Betty Crocker cookbook, the one with the red cover. If you were not fortunate enough to get one for a wedding and/or you're-an-adult-now-you-should-have-this-in-your-kitchen gift, GET IT. The pie crust tips and recipe are seriously some of the easiest ever.
All ingredients are local...which is great especially when you realize that it's a week to Thanksgiving and nothing you order from the states is getting here in time for Turkey Day.
***RANDOM, BUT MAYBE NOT SO RANDOM KITCHEN, APPLIANCE ALERT!****
Betty Crocker Pie Crust
I made 3 crusts, 2 for a covered apple pie and 1 for a pumpkin pie. You can adjust the amounts as necessary.
3 cups of flour
1.5 tsp salt
1 cup of cold butter (2 sticks)
6-10 TBsp of ice water (the ICE part is important and I think this was part of my problem before)
Add the flour, salt and cut up butter into the food processor. Pulse several times until you have pea sized pieces. You can also do this with a pastry cutter or 2 knives, but remember, you want to handle the ingredients as little as possible! Once butter is cut in, start processor and add water all at once. Dough should pull away from the sides of the processor when ready. Add 1 or 2 TBsp of ice water at a time until you see this effect. One tip::: you don't want the dough to form a ball in the processor.
Dump out onto plastic wrap or wax paper. Work quickly and shape into a disc. Wrap and put into fridge for 30 minutes to 1 hour to chill.
Remove dough from fridge and cut into 3 sections. Place sections you are not rolling immediately back into fridge until you are ready to roll out.
To roll out, flour the counter (I'm fortunate to have granite here which keeps cool) or one of those nifty pie rolling guides. For your rolling pin, flour it as well. Roll the dough from the center of the disc, turning every couple of rolls. Again, WORK QUICKLY. If the dough or pin starts to stick, dust lightly with flour. Once dough is a few millimeters thick, lift and place into pie plate.
Bake according to your pie recipe as each one is a little different.
As you can see from the picture above, the apple pie came out fabulous!!!
For additional tips, go to Betty Crocker's website: www.bettycrocker.com/how-to/baking-basics/Pies/Pie-Crust-Tips.htm
Happy Thanksgiving, LLOR Readers!
For additional tips, go to Betty Crocker's website: www.bettycrocker.com/how-to/baking-basics/Pies/Pie-Crust-Tips.htm
Happy Thanksgiving, LLOR Readers!
Tuesday, November 24, 2009
Flying Tortillas
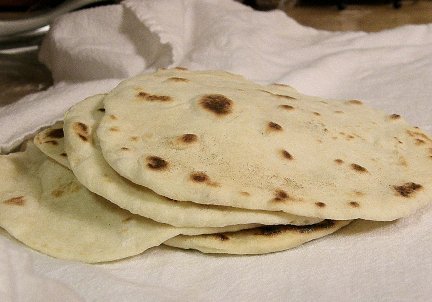
One thing that a good ol' Texas girl must have in her kitchen is tortillas. My mom submitted this recipe that she and her friend made a couple of weeks ago. These will surely throw you off your pre-Turkey Day diet, but dang, they are good.
On a side note, if you are a native Texan like myself, you may know of Texas Tech Red Raider fans throwing tortillas onto the football field for game day. I had to look this one up as it has been a few years. Apparently in 1992 before a Texas A&M game, an ESPN commentator made a comment about Lubbock, the town where Texas Tech is located, in that the only thing there is Tech and the tortilla factory. In protest, the fans threw hundreds of tortillas onto the field. Pretty funny if you ask me....
All ingredients should be able to be found locally as there are only 3!
__________________________________
Tortillas
4 cups of flour (you can use white or whole wheat here)
1 stick of oleo (any substitute would work, including Crisco sticks)
1.5 tsp of salt
Cut the oleo into the flour along with the salt. You can do this by crisscrossing 2 knives or a pastry cutter (if you are all fancy like that :) ). You'll want to do this until you have pea sized pieces, much like making a pie crust.
Knead the dough and roll into balls. The bigger the ball, the larger the tortilla will be. Cover and let dough sit for 20 minutes.
Heat the griddle. You can also use a fry pan as well, but a flat pan (much like one you use for pancakes) works the best. Roll out the balls of dough very thin and put onto griddle. When bubbles start, flip then press. The tortilla is done with there is a little brown on the bubbles.
Remove and let cool in a ziploc bag.
_______________________________________
Now whether you decide to throw these at a football game or eat them, I think you'll find it equally satisfying!
Sunday, November 15, 2009
This Ain’t Your Mama’s Mini Meat Loaves
My friend Nana sent me this recipe after it was a big hit for dinner one evening with her hubby. Meat loaf normally gets a bad rap, but these are really fantastic. Pair them with some potatoes, and you've got yourself a meal that will please any meat-n-potatoes fan in your house.
Many of the ingredients that are listed are interchangeable for local ingredients. If you're on the newer side of cooking, try my Substitutions link on the main page. Also, if you make the full recipe, they can be frozen and the directions on how to reheat are listed. What a fabulous solution to a mid-week meal crisis!
Mini Meat Loaves
- 1 cup ketchup
- 3 to 4 tablespoons packed brown sugar (regular sugar or Splenda can also be used)
- 1 teaspoon ground mustard (try yellow or brown mustard if you don't have the dry stuff)
- 2 eggs, lightly beaten
- 4 teaspoons Worcestershire sauce
- 3 cups Crispix cereal, crushed (I've used Rice Krispies, but any other 'rice' cereal can be subbed---Fitness, Rice Chex, etc)
- 3 teaspoons onion powder (again, use real onions or even dried)
- 1/2 to 1 teaspoon seasoned salt (steak seasoning works great!)
- 1/2 teaspoon garlic powder (fresh garlic works great)
- 1/2 teaspoon pepper
- 3 pounds lean ground beef
Directions
- In a large bowl, combine the ketchup, brown sugar and mustard. Remove 1/2 cup for topping; set aside. Add the eggs, Worcestershire sauce, cereal and seasonings to remaining ketchup mixture. Let stand for 5 minutes. Crumble beef over cereal mixture and mix well.
- Press meat mixture into 18 muffin cups (about 1/3 cup each). Bake at 375° for 18-20 minutes. Drizzle with reserved ketchup mixture; bake 10 minutes longer or until meat is no longer pink and a meat thermometer reads 160°.
- Serve desired number of meat loaves. Cool remaining loaves; freeze. Transfer to freezer bags; seal and freeze for up to 3 months.
- To use frozen meat loaves: Completely thaw in the refrigerator. Place loaves in a greased baking dish. Bake at 350° for 30 minutes or until heated through, or cover and microwave on high for 1 minute or until heated through. Yield: 1-1/2 dozen.
Enjoy these tasty treats with your family soon. Because isn't meat loaf truly American?
Wednesday, November 11, 2009
Vichycoisse aka A Pot Full of Yum
I know, it's probably misspelled, but you get the point.
This recipe is in homage to one of the loftier food blogs in cyberspace and Julia Child, whom that blog was honoring (read Julie and Julia if you get the chance. Great fun for foodies. Also, if you want further history, read Child's: My Year in France, in which she details how she went from a lonely State Department wife--familiar anyone?--to a master chef who changed the face of American /French cuisine almost by accident as she tried to discover her life's passion.)
What you'll need:
2 tblsp. butter
8-10 leeks
4 large russet potatoes
salt & pepper
can of chicken broth/chicken boullion
cream or milk
In a dutch oven or thick cast iron soup pot, melt the butter and saute the leeks until they are translucent. For those of you unused to working with leeks, cut away the green stalk and focus on the white bulb. The leeks should be rather thinly sliced and will quickly saute. Peel and dice the potatoes into small pieces and add them to the pot with the leeks. Add a can of chicken broth and bring to a boil. After broth boils, turn down to a simmer, and let the potatoes cook until tender.
Once the potatoes are cooked, mash down them down until they're smooth. I use a hand food processor. You could probably use a blender, also. Once the potatoes are smooth, taste and then season with salt and pepper. At this point, let the pot sit out for a while until it starts to cool. When no longer scorching hot, put the pot into the refrigerator and let cool. After an hour or two, take out the soup and incorporate enough milk to thin the broth. I use either a cup or two, depending on my liking. If you want to get really fancy, dice up a few chives and sprinkle on the top when serving.
Now, the concept of cold soup might not appeal to you. The great thing is that this soup tastes pretty good warm, too. With some crusty bread, perhaps, and an accompanying plate of cheeses and grapes, you have quite a lovely high-fallutin' French meal. Julia would be proud.
Subscribe to:
Posts (Atom)